Home ![]() Best Practices
Best Practices ![]() Resource Manager
Resource Manager
Best practices for Resource Manager to use Quickscrum
The scrum master or project manager plays a key role in the successful execution of any project. Based on the team structure and nature of the enterprise, their actual day to day activities may vary.
Add Project
Prerequisite
You must be authorized to create a project. If you are not authorized to add a project, please contact your administrator. Otherwise, follow these steps to add a project.


Overview
The project can exist independent of any portfolio in Quickscrum. Your project may or may not be part of the portfolio. As of now, there is no way to link the project with the specific portfolio but if it is part of any portfolio, please use a specific naming convention for the project to identify it.
For ex. If project File Management is part of iFile portfolio, you may keep your project name iFile – File Management
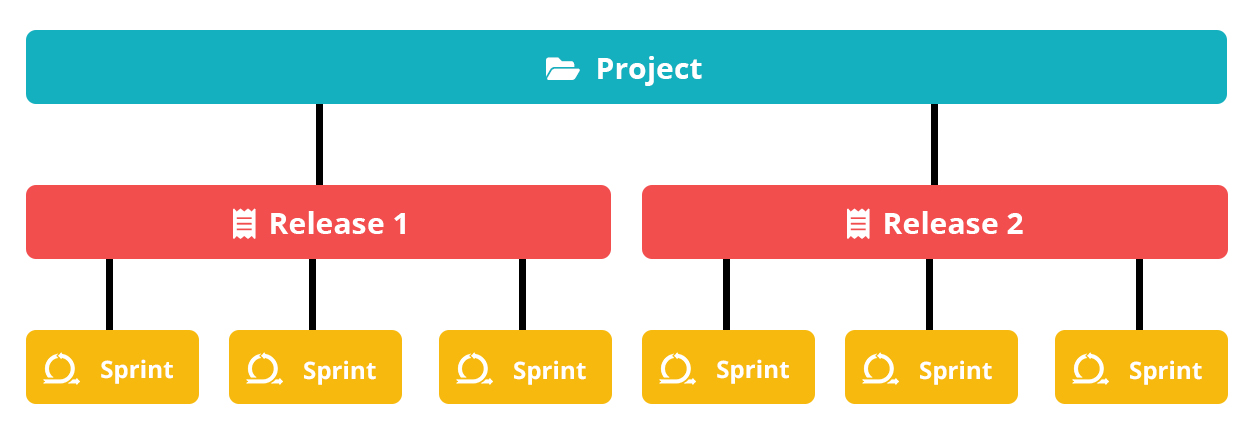
The project should be seen as a given image below,
Assign Team Member
Prerequisite
The project must be created in advance. You must be authorized to create a project. If you are not authorized to add a project, please contact your administrator. Otherwise, follow these steps to add a project.


Overview
The Project can have one or more teams working under it. You can build the teams based on your requirements.
- One project can have => One or more teams (e.g. Development, QA)
- One team can have => One or more team members
- One team member can work in => One or more teams (e.g. Development, QA)
There are following two ways to build the team.
Scenario 1: From Project Administration
If you are responsible as scrum master or project manager to build the team than you can do it from project administration.


Scenario 2: From Resource Scheduling
If within your organization there is a resource manager who is responsible for building the team than contact him.


Prepare Backlog
Prerequisite
The project must be created in advance, follow these steps to add a project. The Backlog can be created for a specific project only.

Overview
Depends on the nature of the project and its team structure, creating a work backlog can be the responsibility of the product owner, business analyst, project manager, or the client. Whoever create it,
- Must have enough domain expertise.
- Must have enough knowledge about the end-users personas.
- Must have enough authority to prioritize and plan them.
- Must be able to clarify workitem in-depth to get executed effectively.
We have decided to keep backlog creation as a part of the product owner best practices. To get more insights, please continue to read here.
Plan Release
Prerequisite
The project must be created in advance, follow these steps to add a project. It can be divided into multiple releases of months or quarters based on the complexity.

Overview
The release is a time boxed goal or milestone to be achieved. It contains a list of user stories to be developed known as – release backlog. It is generally useful when multiple teams are working together and interdependency exist. It keeps every team aligned. Learn how to access the release planning view.
A release should be seen as a given image below,

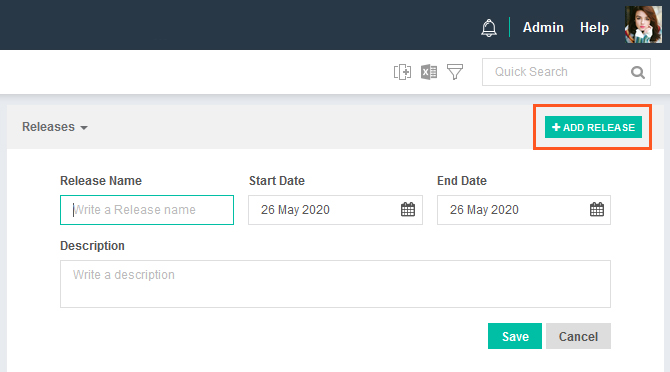
How to add a release?
It’s quite intuitive to add a release, though you can follow these steps to add it.
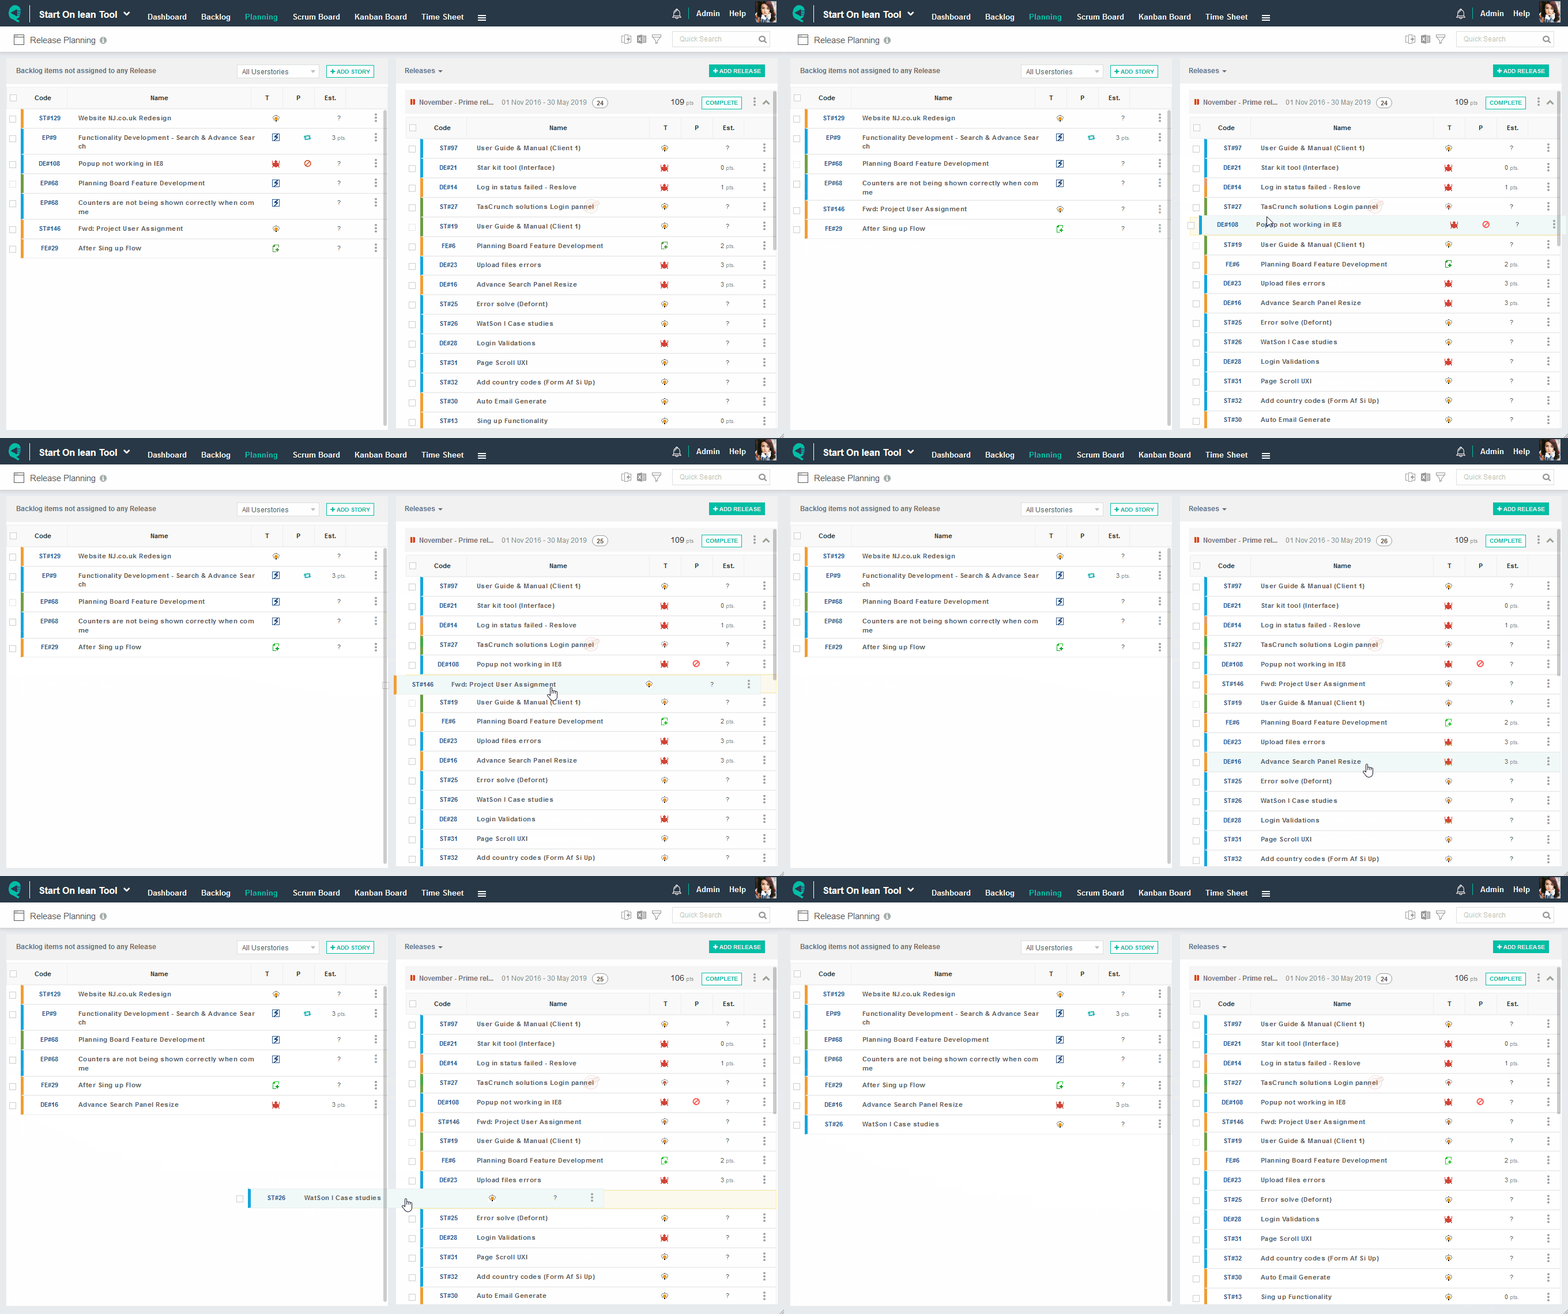
How to plan a release?
Quickscrum provides a release planning view to prepare a release backlog. Just drag and drop user stories from left to right.
Plan Sprint
Prerequisite
- The project must be created in advance, follow these steps to add a project.
- The project can be executed into multiple releases of months or quarters or just executed with sprints of 1-4 weeks based on its complexity. If you must follow releases then release must be created prior to creating the sprint, follow these steps to add a release.

Overview
The sprint is a time boxed goal or milestone to be achieved with a duration of 1-4 weeks. The objective of every sprint is to deliver a maximum of whatever is planned to the end-user, hence shorten the time to market (deliver). Planning is a very critical part of scrum. You must follow the I.N.V.E.S.T rule to write user stories. It is highly recommended to complete 100% tasks of few stories rather than completing partial tasks of all planned user stories.
The sprint can be planned and executed with one of the following two different scenarios,
Scenario 1: Follow the release
If you do release planning, then sprint must be created under specific release as shown in the image below

Scenario 2: Don’t follow the release
If you don’t do release planning, then sprint can be created directly under the project as shown in the image below

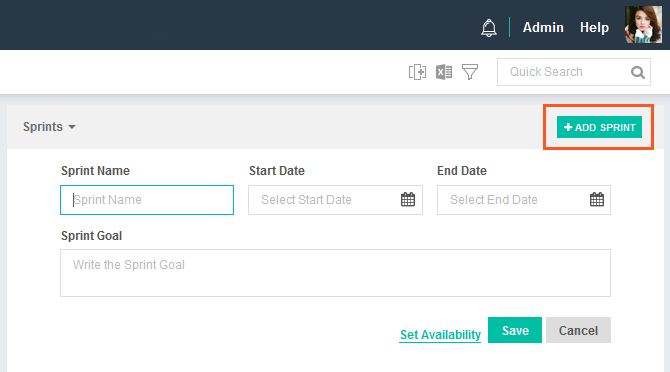
How to add a sprint?
It’s quite intuitive to add a sprint, though you can follow these steps to add it.
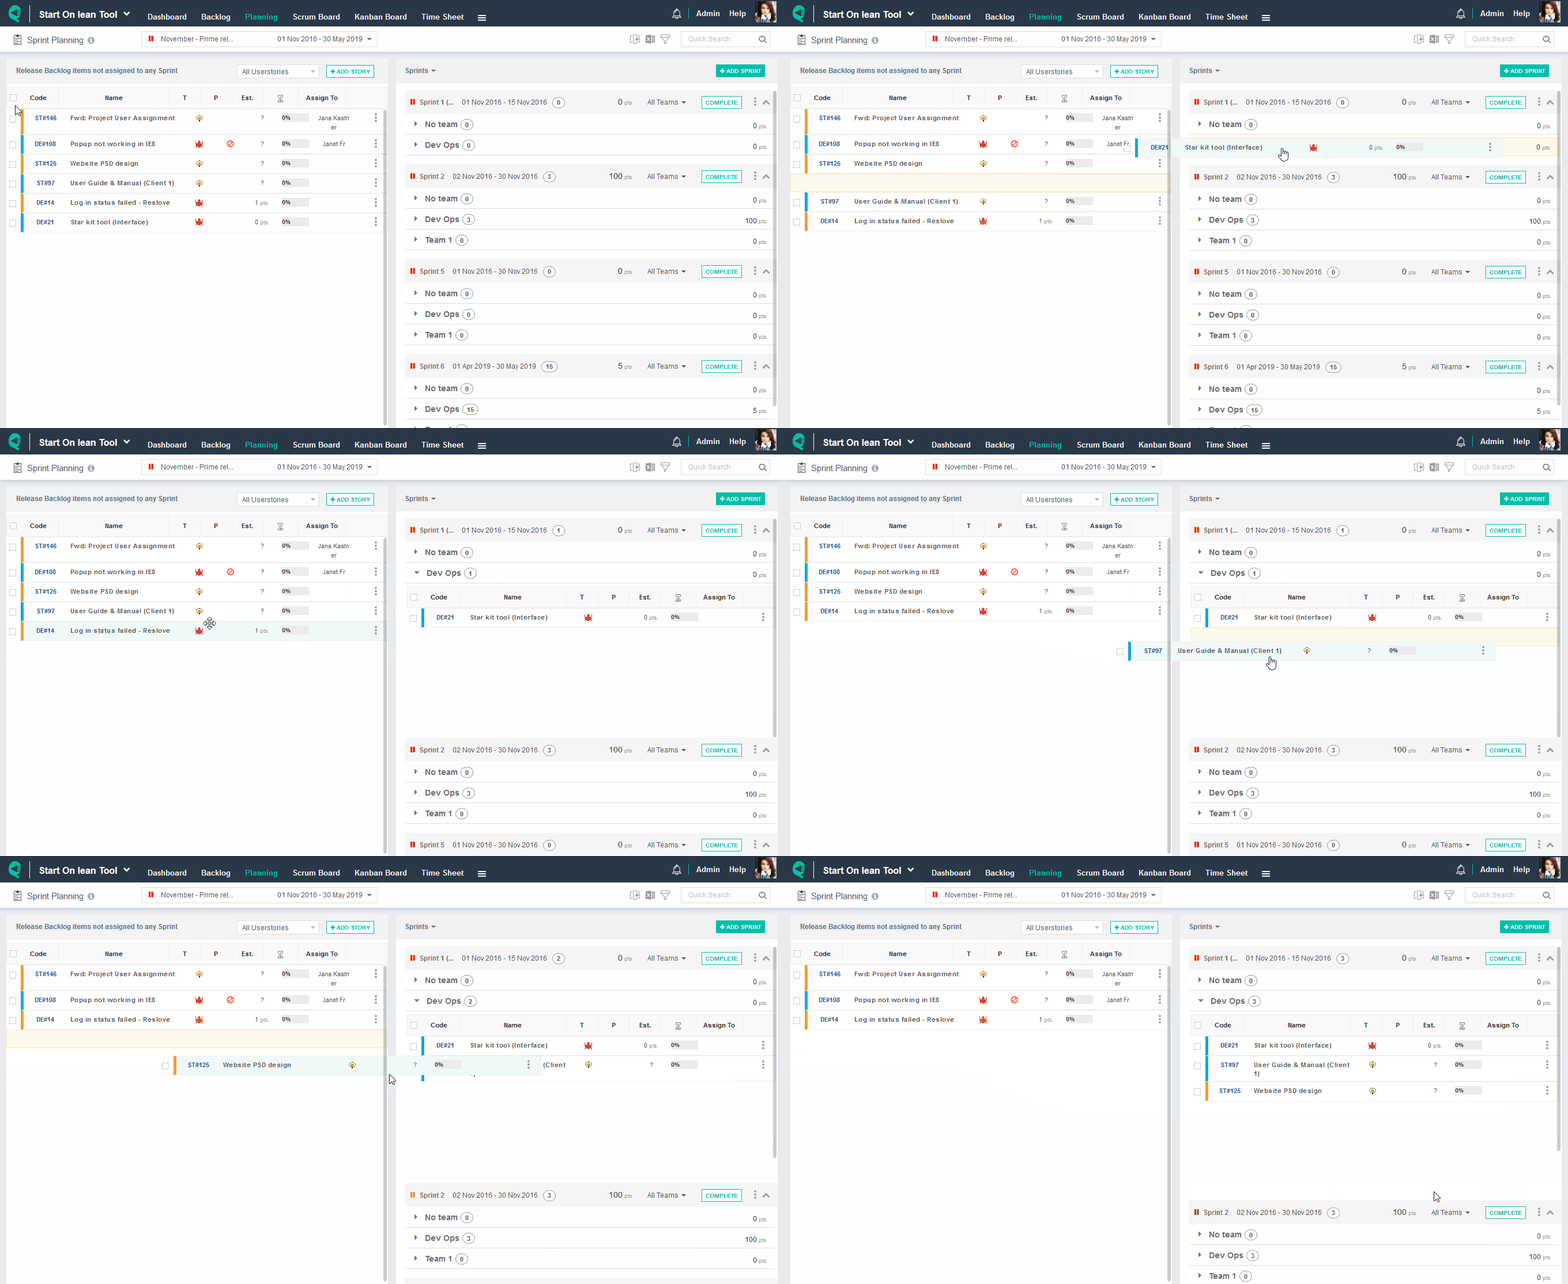
How to plan a sprint?
Quickscrum provides a sprint planning view to prepare a sprint backlog. Just drag and drop user stories from left to the right panel. To get more insights into sprint planning, please read here.
Manage Sprint Availability


Overview
Manage sprint availability helps scrum master or project manager to allocate team members and their respective working hours within a sprint. Please note that,
- One sprint can have => One or more teams (e.g. Development, QA)
- One team can have => One or more team members
- One team member can work in => One or more teams (e.g. Development, QA)
You configure team availability based on your own requirement.
How to manage sprint availability?
Manage Sprint availability is not a mandatory process to do. The sprint availability can be set with one of the following two different scenarios,
Scenario 1: Resource scheduling is done
If resource scheduling is done in advance by the resource manager then, the sprint availability view displays the scheduled hours.
Total Sprint Availability = SUM [Scheduled Hours of all project members]
Scenario 2: Resource scheduling is not done
If resource scheduling is not done in advance by the resource manager then, the sprint availability view displays the working hours.
Total Sprint Availability = SUM [Working Hours of all project members]
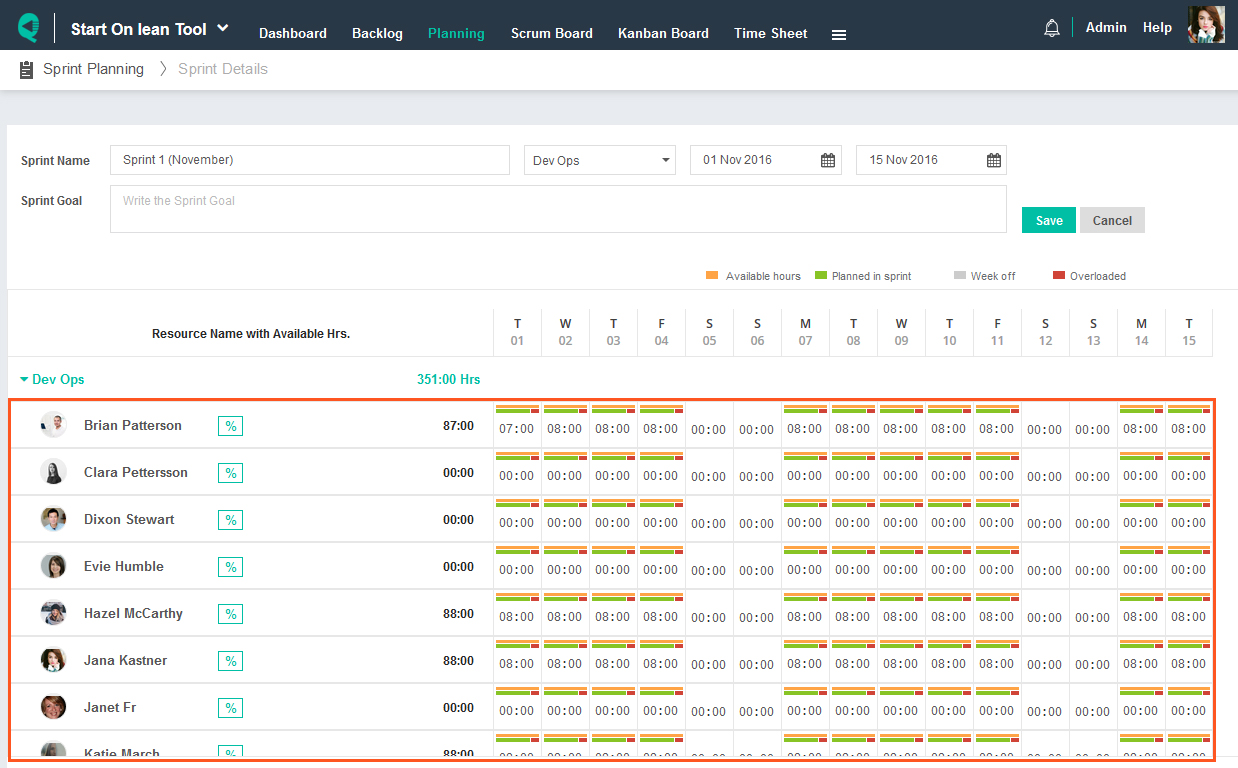
By default, the sprint availability view displays all teams and their respective team members as configured in project admin. You can edit their daily availability as shown in the image below.
Break Userstory into actionable tasks
Prerequisite
The userstory is planned in the sprint. Though you can add a task by opening the userstory popup from any view, It is strongly recommended not to use this practice, when following the Scrum framework.

Overview
The userstory should be divided into smaller actionable tasks. The userstory and task both can be assigned to only one user at a time. We may consider to assign multiple team members to the userstory at a time in future, but we will never permit the assignment of more than one user to a single task at time. If only one person is responsible for the task execution, then s/he is absolutely answerable to it.
When multiple team members are required to work upon a single userstory,
- Assign userstory to one team member, who will take overall responsibility
- Divide a userstory into actionable tasks such that only one team member is required to acts upon it at a time.
In case if you are obliged to assign multiple team members to the single task (strongly not recommended), assign a task to a team member one at a time, then change the team member. All activities are tracked and can be viewed anytime. To get more insights into the breakdown userstory, please read here.
How to break userstory into tasks?
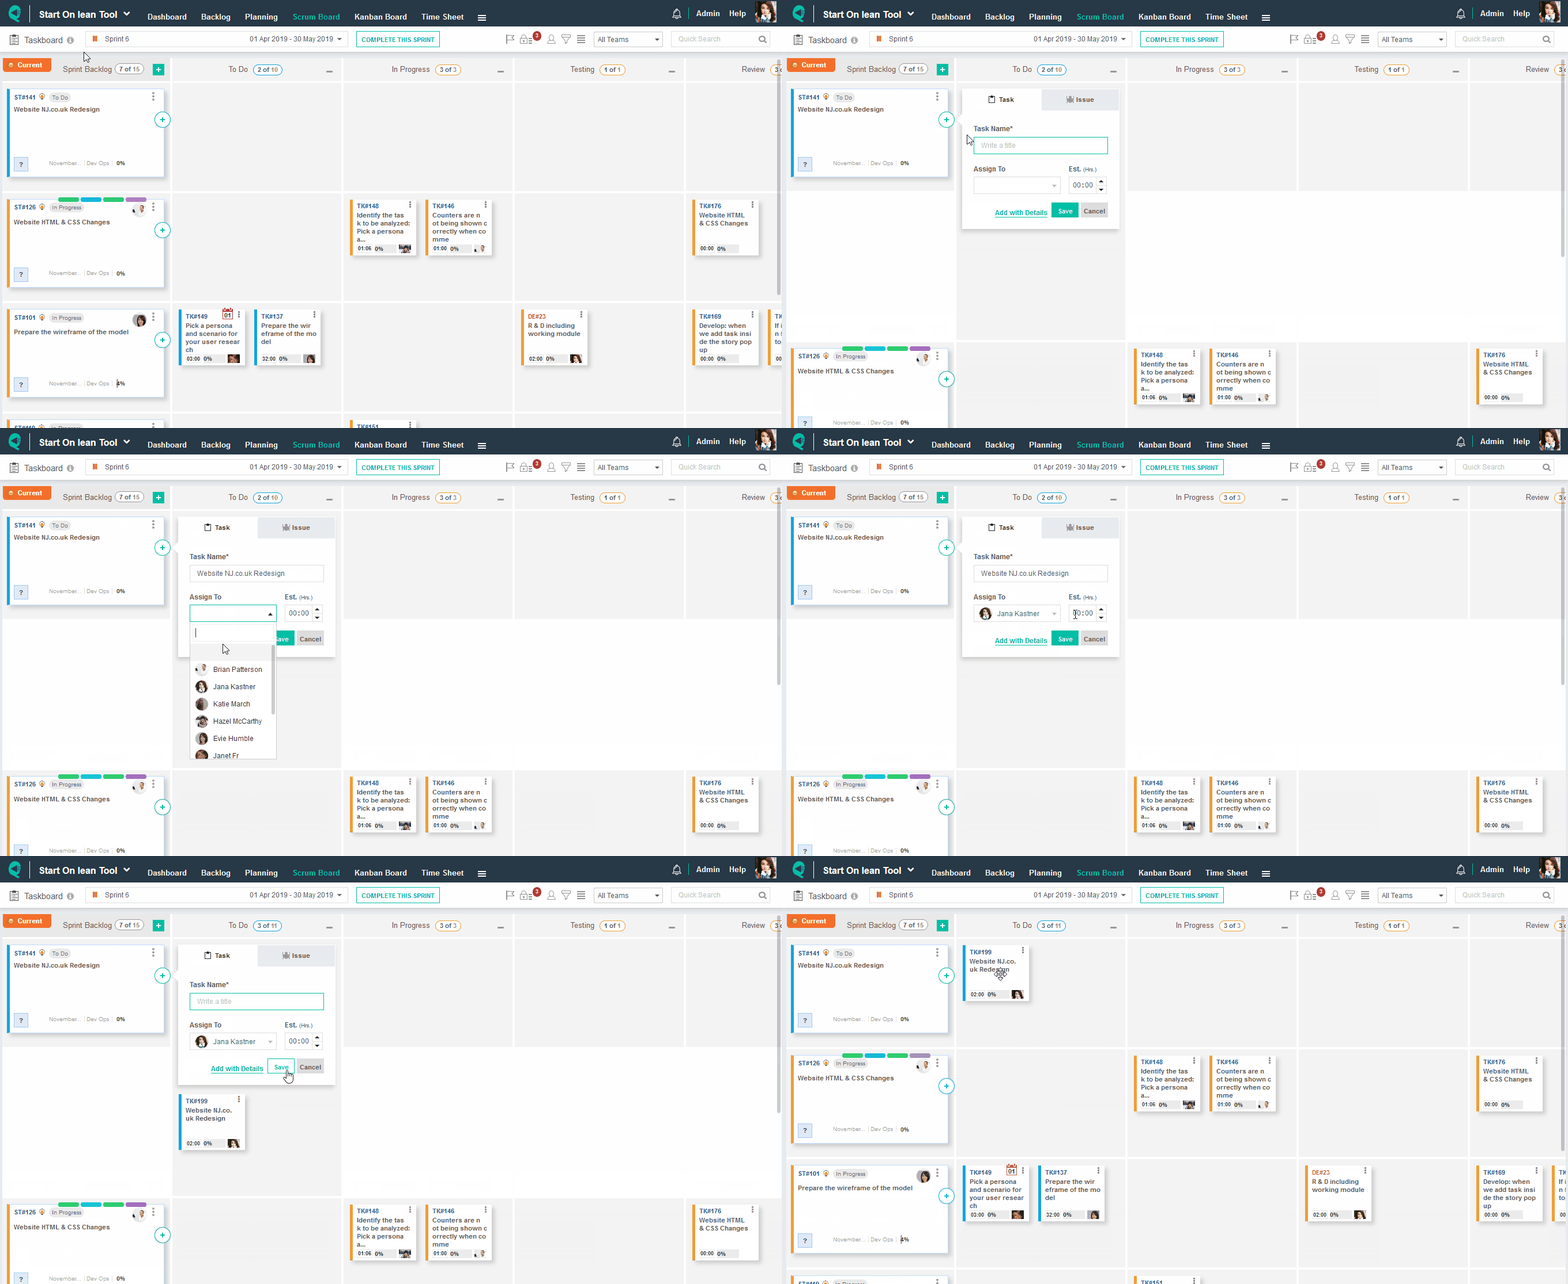
Fill in Task Details


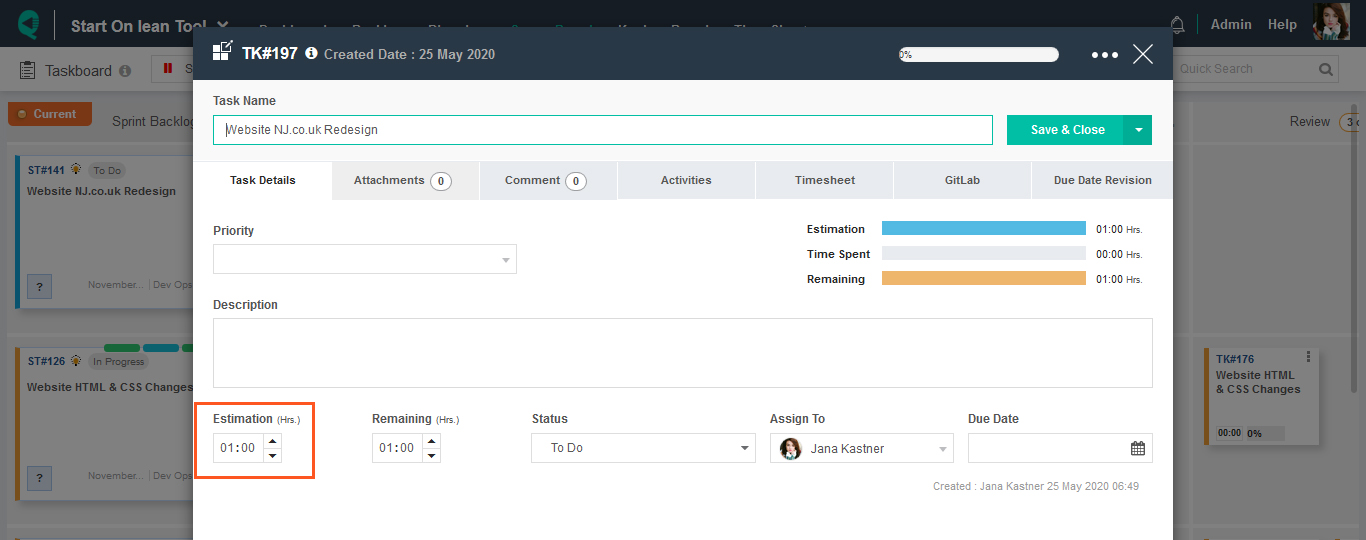
Estimate a task in hours
As a part of the best practice, we strongly recommend estimating tasks in hours. This helps you to measure overall sprint workload and individual team member workload. Also, a report can be generated for estimation vs. actual time spent. By default, Initial estimation hours are set to the remaining hours. As a part of the execution, the team member should change the remaining hours on a daily basis to generate a burn-down chart which is very helpful to track the sprint progress.
Scenario 1: Estimate a task while creating it.
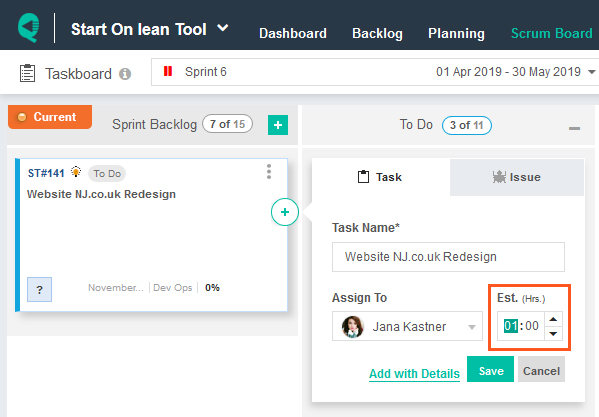
Scenario 2: Estimate a task by opening the task popup.
Set task category
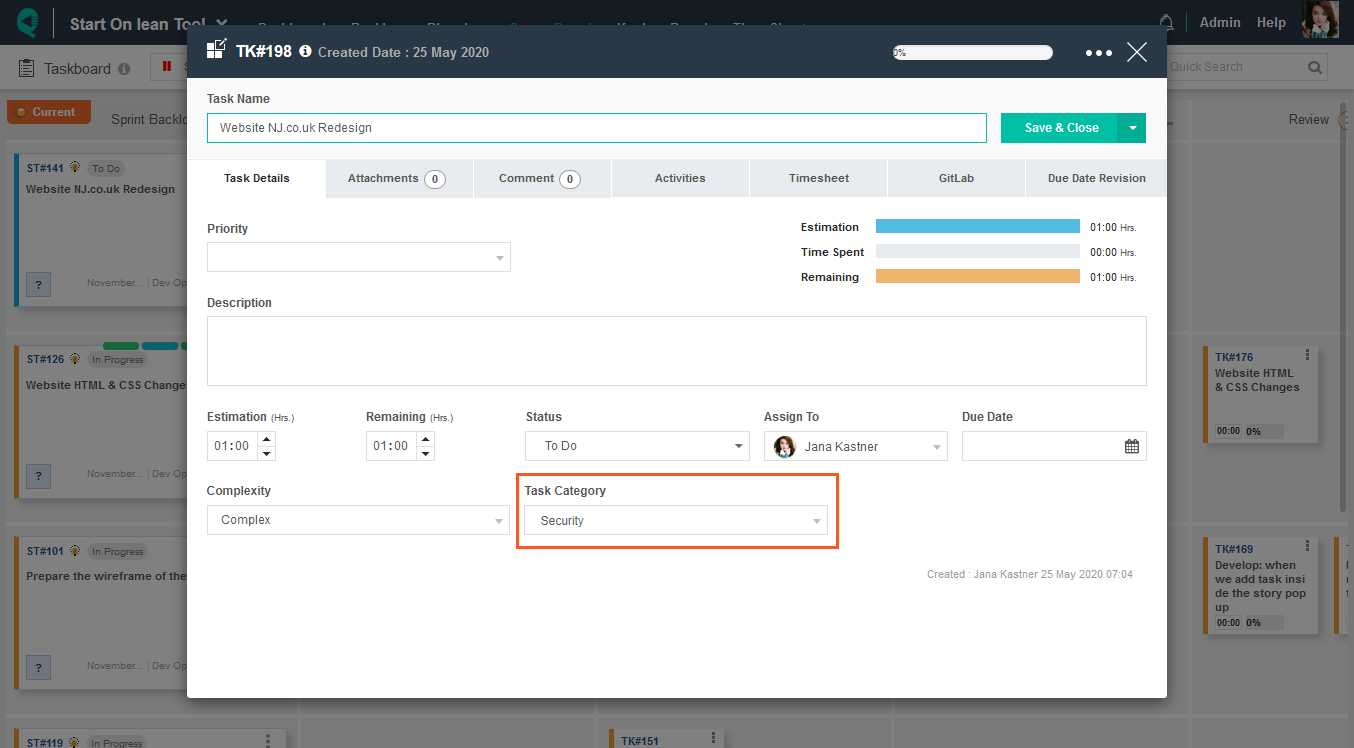
The Task category is an optional field. Though we strongly recommend to fill it as it can give you great insights about where your team is spending most of the time. The report can be generated by the project-wise, the company-wise, or the resource-wise.
For ex. By categorizing your task into Development, QA, Meetings, Miscellaneous, etc. You can easily get the report over the percentage of time spent on each activity.
Task category values are customizable and can be managed from the company administration.
Set task complexity
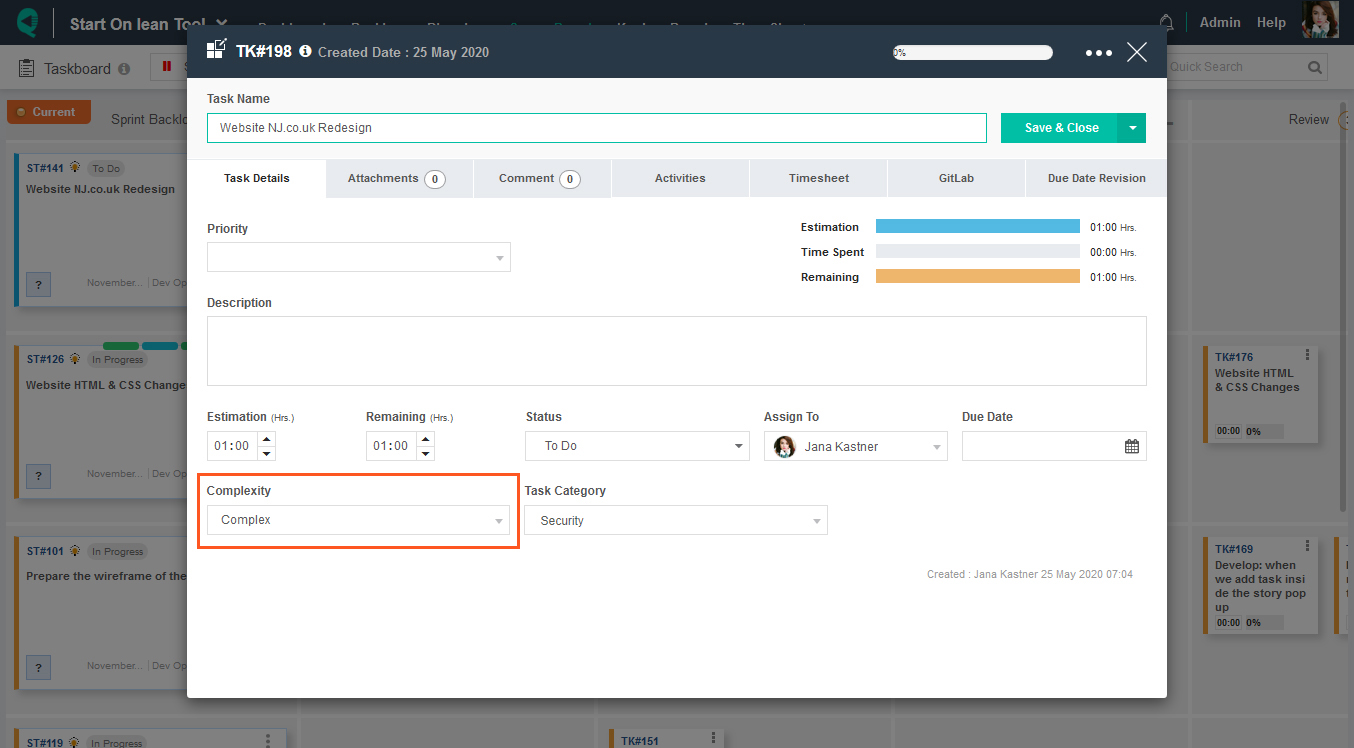
As the name indicates, Task complexity defines the complexity of the task. By default, Quickscrum provides three values – Complex, Medium & Simple. You can straight away link up the complexity with the approximate amount of time spent on the task.
for example.
- Complex Task => More than 16 hours
- Medium Task => 4-6 hours
- Simple Task => Less than 2 hours
Task complexity values can be managed from the company administration.
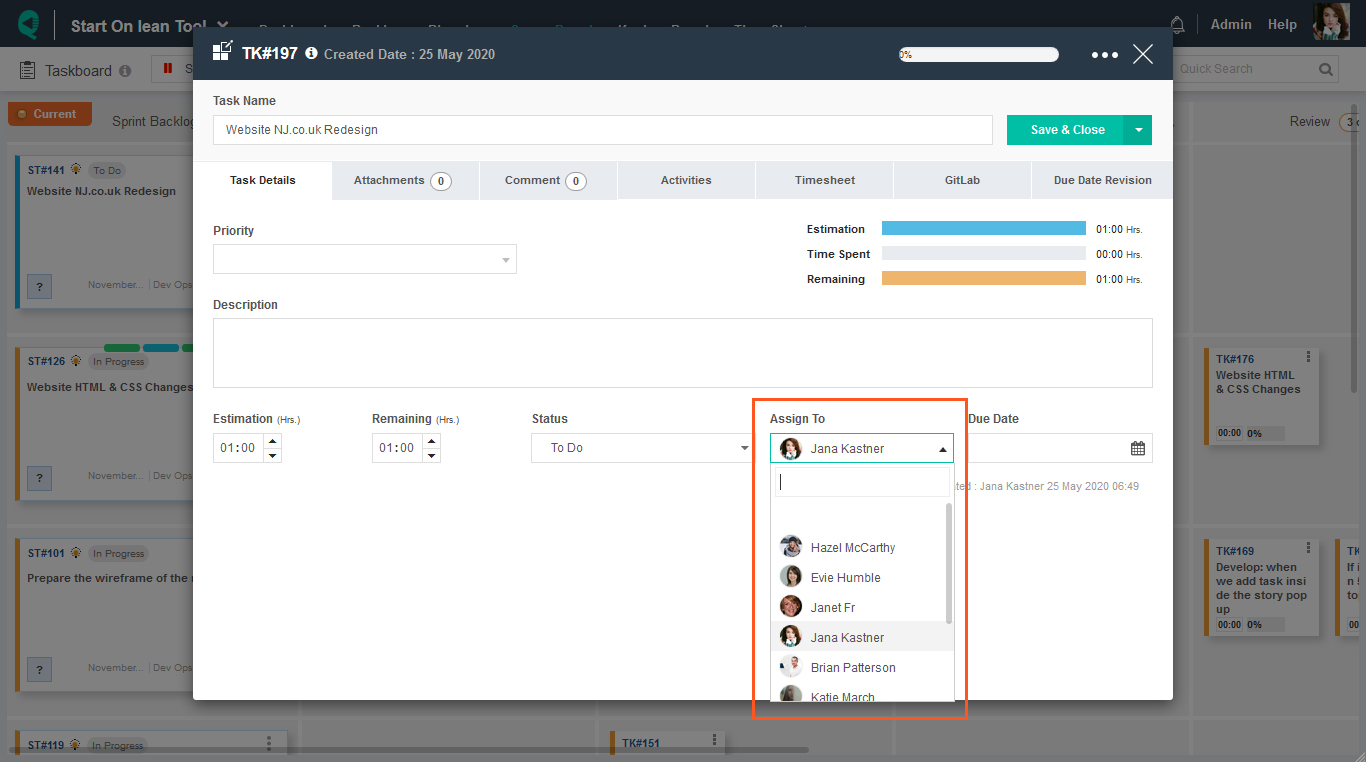
Assign a task to the team member
The task is an actionable item. It can be assigned to only one user at a time. We have intentionally not permitted the assignment of more than one user to a single task. If only one person is responsible for the task execution, then s/he is absolutely answerable to it. In case if you are obliged to assign multiple users to the single task (strongly not recommended), assign a task to a team member one at a time, then change the user. All activities are tracked and can be viewed anytime. To get detailed insights into how to assign a team member to the task, please read more.
Scenario 1: Assign a task while creating it.
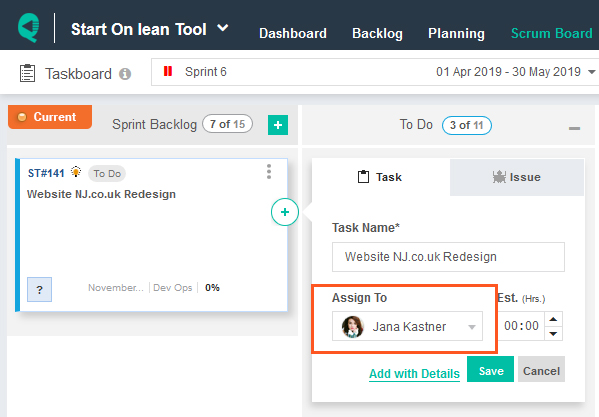
Scenario 2: Assign a task by opening the task popup.
Monitor Resource Workload

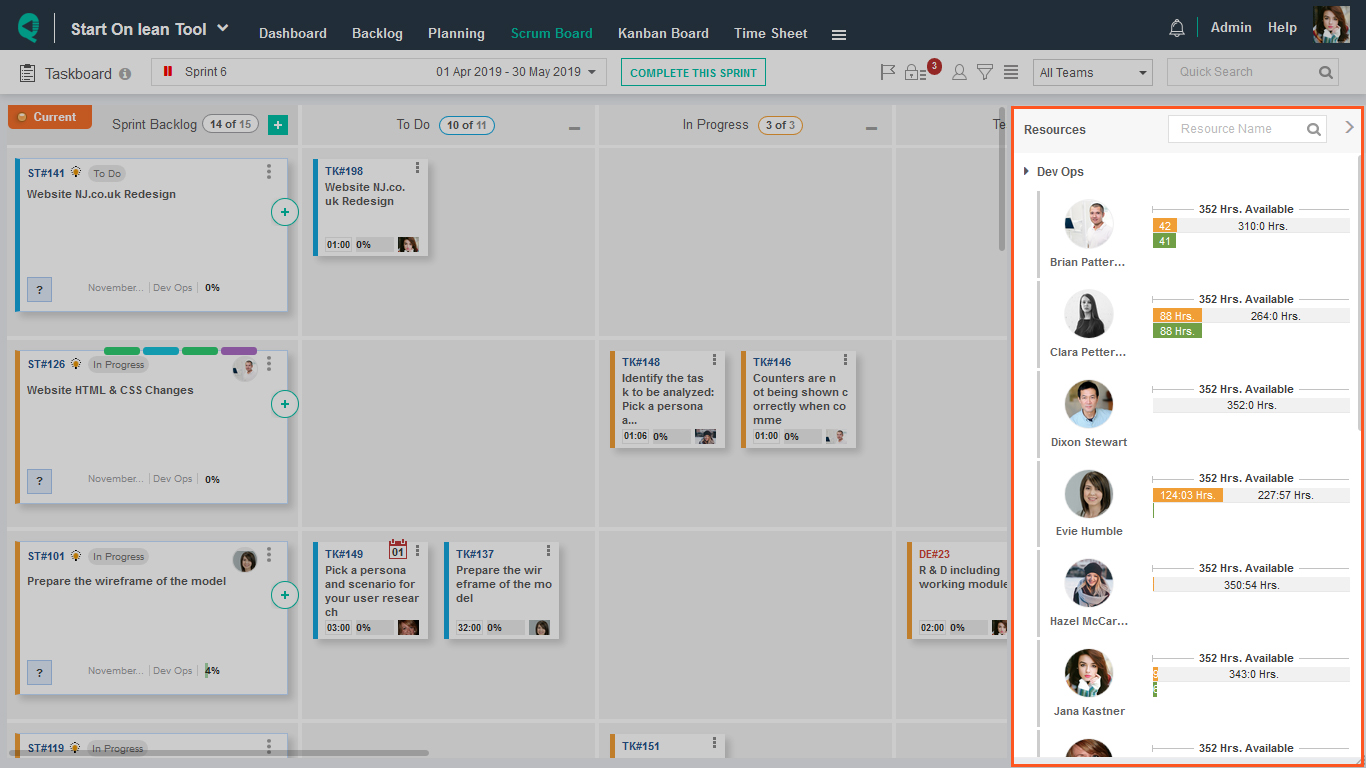
The resource workload view helps to plan the individual team member’s workload for a specific sprint. It is available within the scrum board.
How to monitor resource workload?
Visually compare the following three key figures for all team members and plan sprint accurately.
- Sprint Availability (hrs.)
- Estimated Work Assigned (hrs.)
- Work Completed (hrs.)
Monitor Sprint Progress
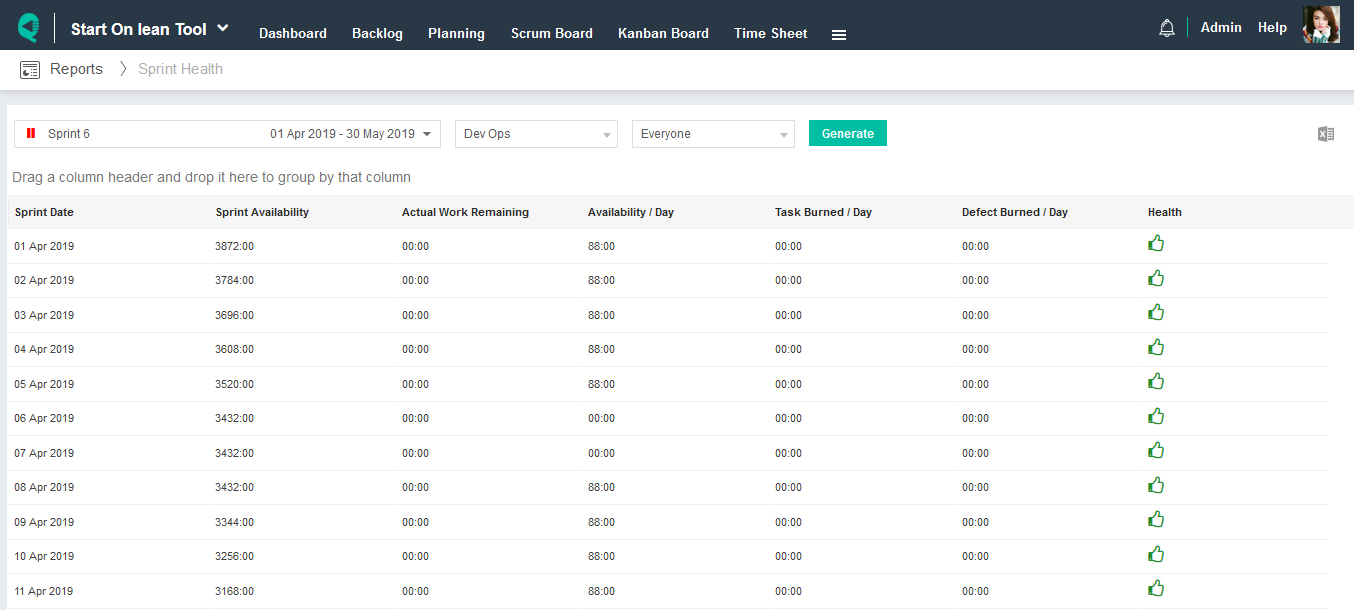
Monitoring sprint progress without a work management tool is quite challenging. Quickscrum provides configurable burndown chart and sprint health report to measure sprint progress on a daily basis.
Burndown Chart

A burndown chart is a graphical representation of work left to do versus time. The outstanding work (or backlog) is often on the vertical axis, with time along the horizontal. It is useful for predicting when all of the work will be completed. To get more insights of the burndown chart, please read here.

Sprint Health Report

A Sprint health report is a tabular representation of daily work left to do. If you are not comfortable working with graphs then sprint health report can surely be useful. It is also flexible to export it in to excel and send it to someone.
Review Completed Sprints

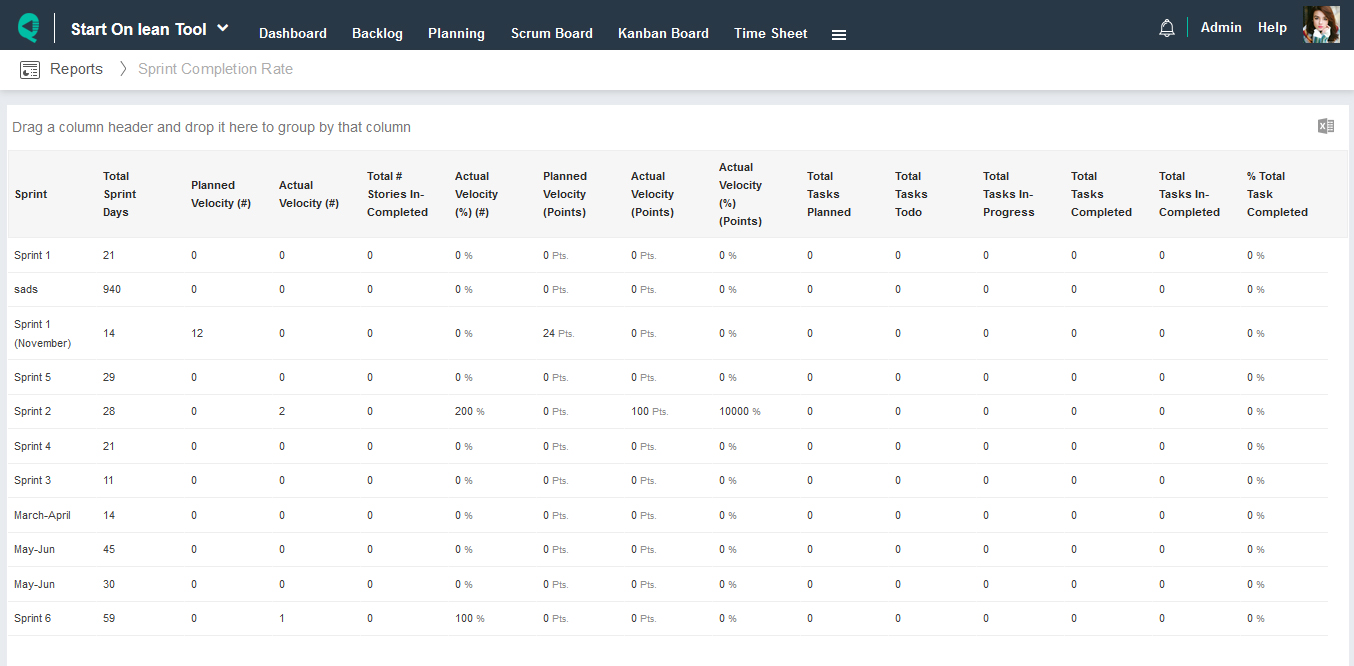
The sprint completion rate report is useful to get insights over completed sprints within a project. It provides insights into three different units,
- Userstory numbers – Planned, Completed, % Completed
- Userstory points – Planned, Completed, % Completed
- Tasks numbers – Planned, Completed, % Completed
Perform Sprint Daily Stand-up

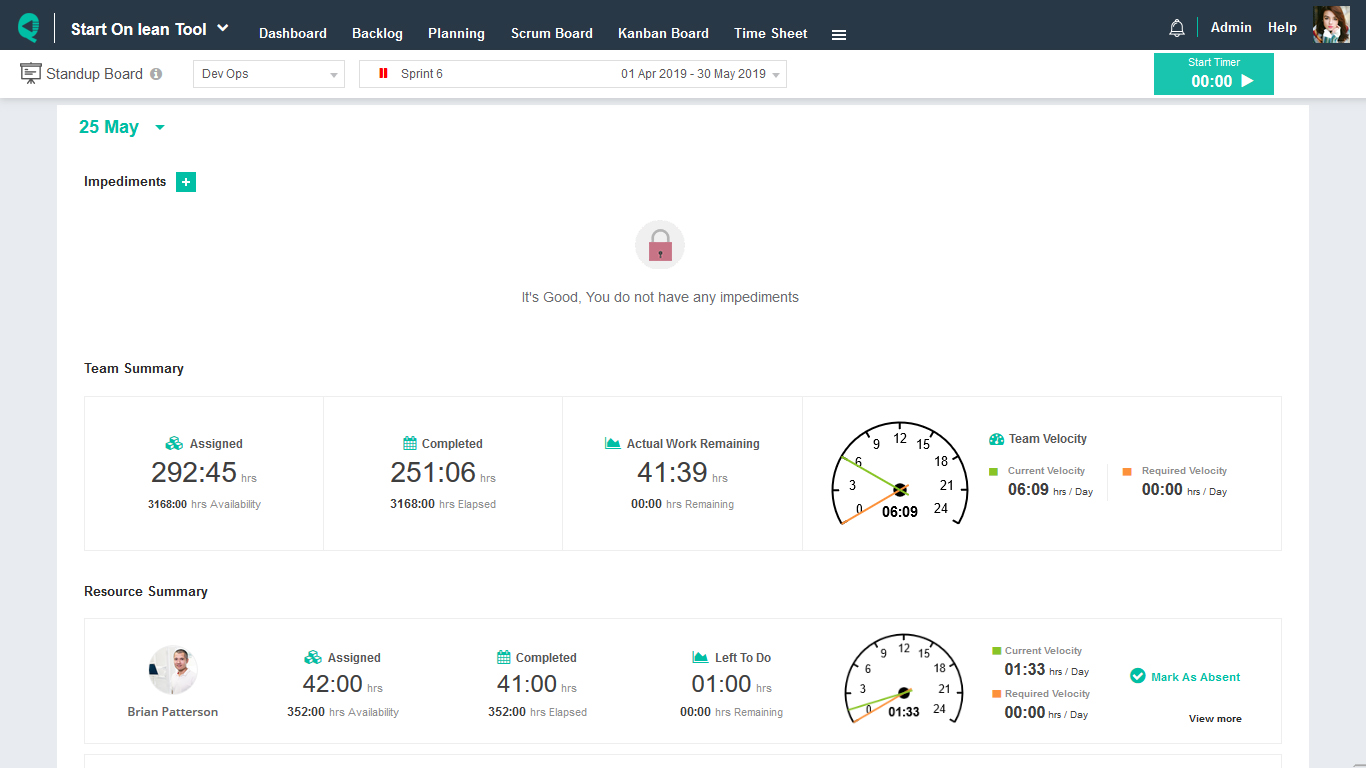
The sprint daily stand-up meeting is a 15 min status report meeting performed by the team every morning. Without any progress report, the meeting becomes unproductive. To get more insights into the sprint daily stand-up meeting, please read here.
Quickscrum has designed a special view to make daily stand up meeting effective. It provides,
- Tracking of key metrics for teams and individuals,
- Total Availability vs. Planned Work
- Elapsed Time vs. Completed Work
- Time Remaining vs. Work left to do
- Start & stop timer to measure time spend for the standup meeting
- Create impediments, assign responsible and set a due date
To perform an effective sprint daily stand-up meeting via Quickscrum, please read here.
Perform Sprint Review

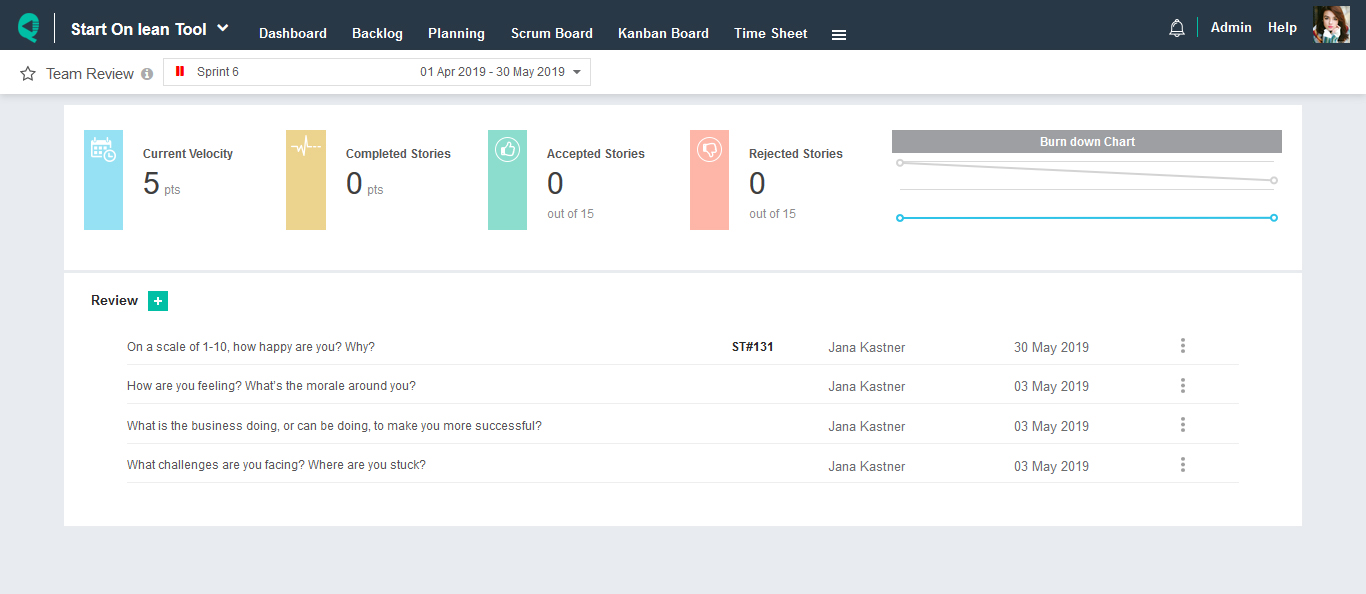
The sprint review meeting is kept at the end of every sprint for the demonstration to the client and take the feedback. To get more insights into the sprint review meeting, please read here.
To perform an effective sprint review meeting via Quickscrum, please read here.
Perform Sprint Retrospective

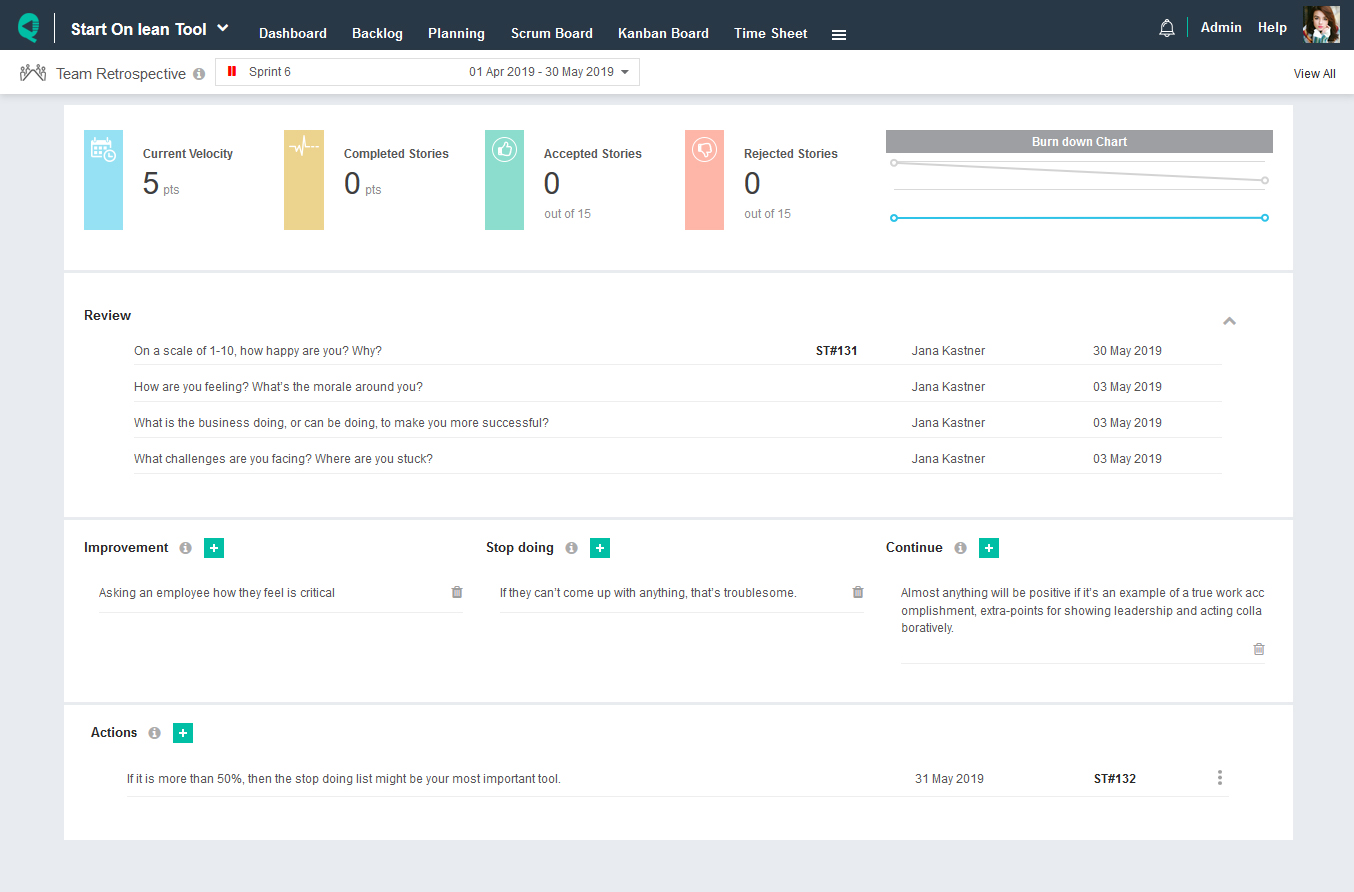
The sprint retrospective is kept at the end of every sprint at which the team discusses the just-concluded sprint and determines what could change that might make the next sprint more productive. The sprint review looks at what the team is building, whereas the retrospective looks at how they are building it. To get more insights into the sprint retrospective meeting, please read more.
To perform an effective sprint retrospective meeting via Quickscrum, please read here.
Analyse Timesheet

Being a team leader, how would you analyze who did what and in how much time? There is certainly a need for a timesheet for every project. If filling timesheet becomes part of company policy then every single hour is accountable. In the end, the leader can also calculate billable hours. There are multiple views available for timesheet in Quickscrum.
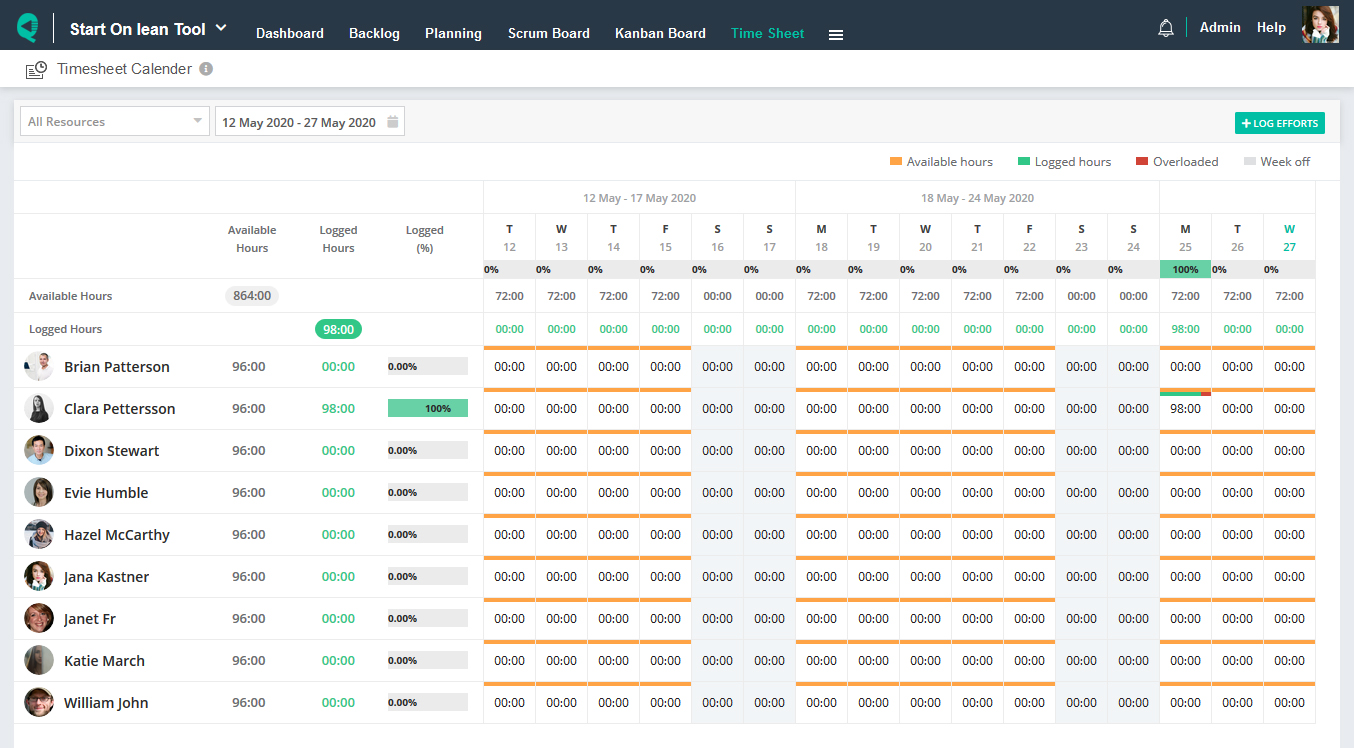
Timesheet Calendar

Timesheet Calendar view helps team leaders to compare availability vs. time logged in a visual manner. To get more insights into the timesheet calendar view, please read more
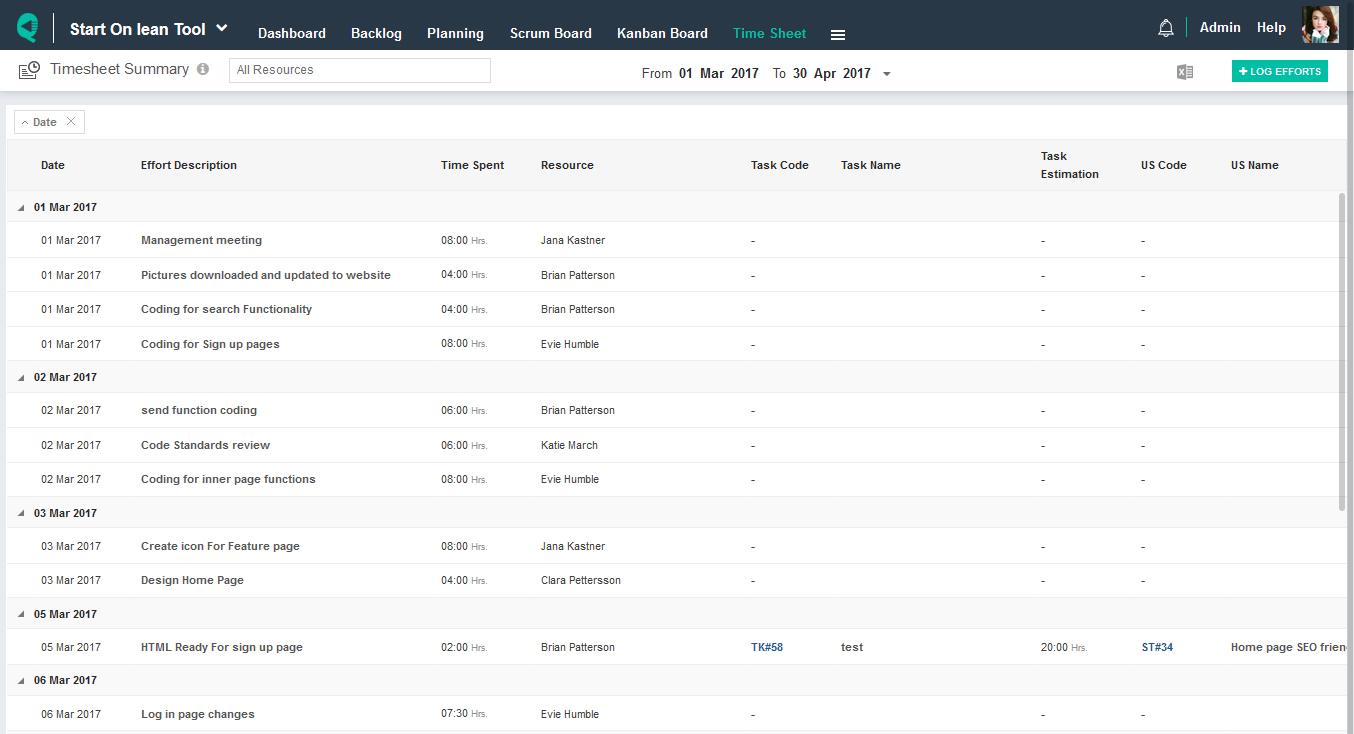
Timesheet Summary

Timesheet Summary view helps team leaders to view who is doing what in how much time. It is also exportable in excel. To get more insights of timesheet summary view, please read here.
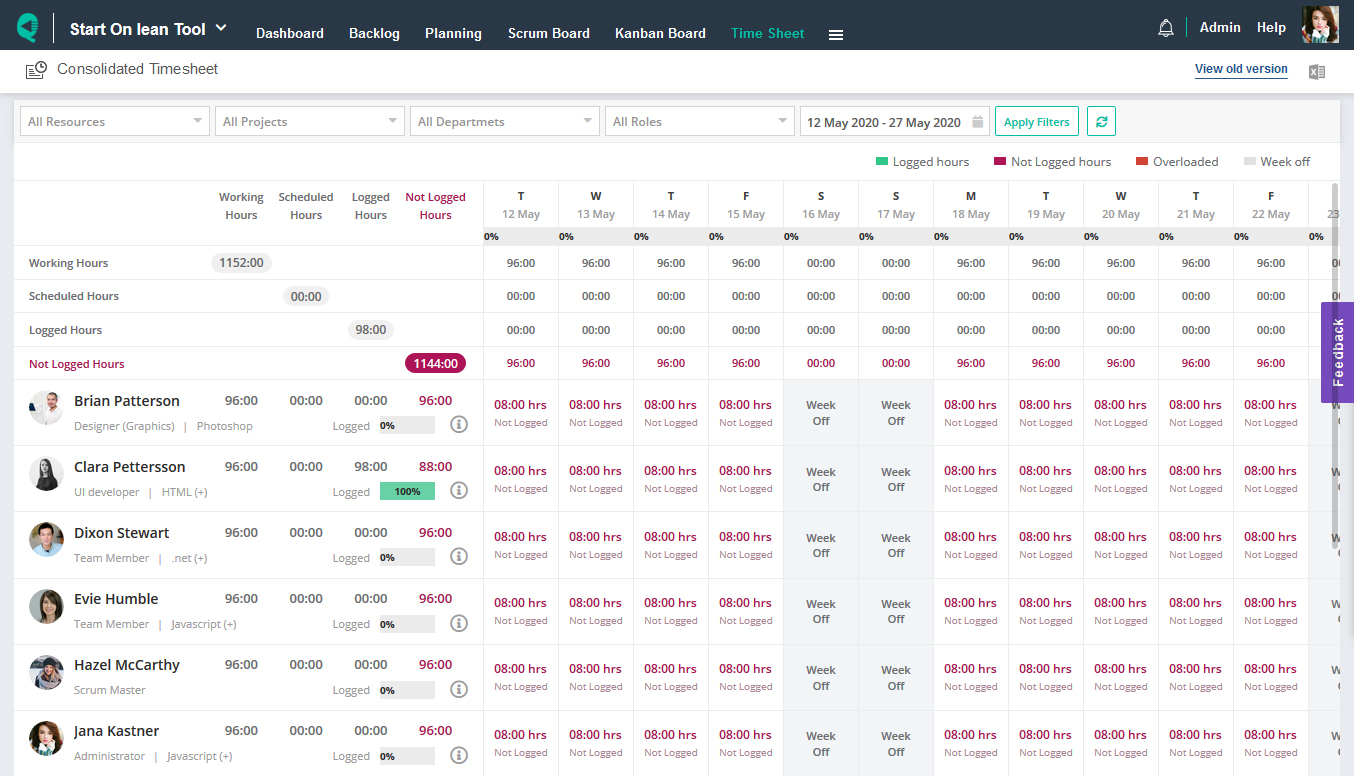
Consolidated Timesheet

Consolidated Timesheet view helps resource managers or top-level executives to get insights over billable time or time logged by the departments, roles, projects, or a resource. It is also exportable in excel.
Best practices
- Step 1: Add Project
- Step 2: Assign Team Member
- Step 3: Prepare Backlog
- Step 4: Plan Release
- Step 5: Plan Sprint
- Step 6: Manage Sprint Availability
- Step 7: Break Userstory into actionable tasks
- Step 8: Fill in Task Details
- Step 9: Monitor Resource Workload
- Step 10: Monitor Sprint Progress
- Step 11: Review Completed Sprints
- Step 12: Perform Sprint Daily Stand-up
- Step 13: Perform Sprint Review
- Step 14: Perform Sprint Retrospective
- Step 15: Analyse Timesheet